Add to Favourite

After Effects: 3D Scan Effect Tutorial
Views: 27074
Likes: 348

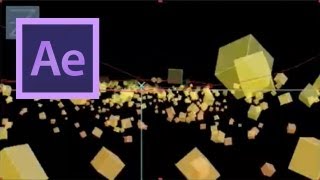
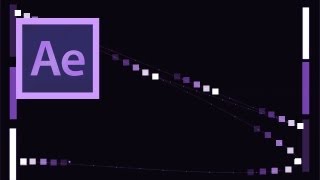
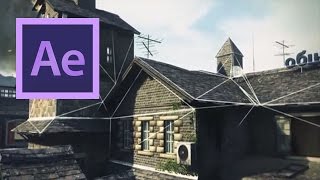
In this tutorial VideoFort Don shows you how to create an awesome 3D scanning effect to your videos using Adobe After Effects and Cinema 4D. After watching this tutorial, you will be able to add depth and detail to your finished project....
  • 1 Students
Watch Now
Add to Favourite

After Effects: 3D Space Basics
Views: 26556
Likes: 93

  In this After Effects VideoFort Jon shows you how to place and manuever object into a 3D space. Start out by creating a new solid the size of your comp. From there go to you Effects and Presets pane and search for “CC Particle World”. Drop this effect onto your solid layer. This effect is a 3D aware effect and works in a 3D plane. If you add a new layer camera you can navigate through the 3D space using the camera and switching between the Orbit Camera, XY Camera, or the Z Camera. From here you can add some media, pictures or video. Once you have added the new media you can put it in the 3D plane by clicking the 3D layer box in the Comp layer window. All positions are key frameable, play around with it and show us what you can do!...
  • 1 Students
Watch Now
Add to Favourite

After Effects: Particle Dance
Views: 24156
Likes: 228

In this tutorial VideoFort Don shows you how to create a colorful particle animation with trapcode particular in After Effects. First, after creating a new composition, you create a solid and add the “trapcode” effect. Next you need to make the particles animate using a new light and changing the position of the light. You then fine tune the path of the particles and the choose the colors of the particles....
  • 1 Students
Watch Now
Add to Favourite

Cinema 4D: Model Road Tunnel Pt 1
Views: 22734
Likes: 159

In this http://www.VideoFort.com Cinema 4D Model Road Tunnel tutorial Pt. 1, VideoFort Don shows how to model a Road Tunnel, based off of an online image. Start by loading the image into the front viewport, and onto a plane. This allows the model to be viewed in this perspective, without having to jump through other views. Than create a plane, hit C, to put it into an editable mode. As many of the objects and shapes are very simplistic and the sides are rather similar, select symmetry to mirror across the axis. Going to edge mode, and hitting extrude allows you to manipulate the edge, creating new walls and corners to play with. After creating this basic section of the tunnel, it is time to create the more detailed items within the tunnel, such as the rails and lights. By creating multiple cross-sections this will allow you to create sections that can be changed. Bevel becomes a useful tool when creating edges or submerging areas, to create holes. Creating a cylinder will allow a basic shape for the start of your tunnel rails. Slimming the cylinder will give you a more realistic and ideal shape. Another way to create a.......
  • 1 Students
Watch Now
Add to Favourite

After Effects: Particle Motion Backgrounds
Views: 22570
Likes: 145

In this http://www.VideoFort.com VFX tutorial Don shows you how to create particle motion backgrounds in Adobe After Effects. This is something you can use with VideoFort stock footage. You can also work with this effect on a green screen or chroma key setup. VideoFort helps film and video makers add entertainment value and increase viewer satisfaction by providing them with the best stock footage on the planet. VideoFort is the first all HD subscription-based stock footage provider to offer its members unlimited access to some of the world’s most exclusive content. In addition to high-quality stock footage, VideoFort offers free VFX templates, free filmmaking tutorials, and a creative forum where video producers can collaborate and interact. VideoFort footage has been used in Hollywood Movies, Award Winning TV Shows, Broadcast TV Commercials, and Online Videos. Customers range from amateur videographers to professional YouTubers and world-renowned directors....
  • 1 Students
Watch Now
Add to Favourite

Cinema 4D: Fracture A Hole in Element 3D
Views: 22327
Likes: 180

In this VideoFort tutorial, Don shows us how to fracture holes using Element 3D. Techniques covered include isolating a section of a plane, extruding objects, and breaking objects apart. If you’re new to working with particles, Don also touches on this subject and provides a basic understanding on how to manipulate them. The workflow between C4D and Element 3D/After Effects is also covered. Used together, these techniques create an effect perfect for breaking pieces off of a larger object. Some uses might include logo stings, ballistic hits, explosions, and earthquakes, to name a few. Employ this method on your next production to enhance the reality of a scene of destruction! VideoFort: The first ever Royalty Free Stock Footage Library to offer Unlimited Downloads of all HD Video Clips. VideoFort empowers creative freedom by giving film and video makers access to one of the best stock footage resources on the planet. VideoFort is the first all HD subscription-based stock footage provider to offer its members unlimited access to some of the world’s most exclusive content. In addition to high-quality stock footage, VideoFort offers free VFX templates, free filmmaking tutorials, and a creative forum where video producers can collaborate and interact. VideoFort.......
  • 1 Students
Watch Now
Add to Favourite

Cinema 4D: Tron Light Cycle Tutorial
Views: 21418
Likes: 138

In this video tutorial, VideoFort Don demonstrates how to create the Light Trail effect seen on the Light Cycles in Tron using Cinema 4D. By the end of this tutorial you will learn the basics of creating the light trail behind the Tron Light Cycle and learn how to refine it to make it more realistic. VideoFort Don first creates a scene where the light cycle can be seen moving through the shot and past the camera. The light cycle is attached to a track that features a null object carrying the 3D light cycle. A new null is created and parented to the existing null object found on the track. By parenting the new null to the existing null, the new null will acquire the same attributes for position and rotation used for movement. A rectangle is added and scaled using Sweep Nurbs to create the trail behind the light cycle. next, VideoFort Don then adds material to the rectangle to create color to the light trail. Adding material to the rectangle enhances the appearance of the trail, making it look more genuine....
  • 1 Students
Watch Now
Add to Favourite

After Effects: Using Trig Expressions and Particular
Views: 21135
Likes: 116

In this After Effects Tutorial VideoFort Jon shows you how to incorporate trignometry into expressions to create a sprial effect using Trapcode Particular. Start out by creating a new comp 1920×1080, 24 fps, duration 10 seconds. Now create a new light, make the light type Point, and make sure to call it “Emitter”. From there create a new solid and apply The Trapcode Particular effect, and rename it Particular. Now change the emitter type to light and bring the Velocity and Emitter Size values to 0. Select the Emitter layer and press p on the keyboard to bring up the position and set a first key frame. Now move forward in time and move your Emitter to another position to set the second keyframe. Now you should have a motion where the light particles travel from one keyframe to the next. Now option click on the Emitters’ position stop watch to bring up the expression controls. Type in the following expression: x=Math.sin(time*10)*50; y=Math.cos(time*10)*50; z=time*100; [x,y,z]+value Now scrub through your comp, your Emitter should be doing a spiral across the screen. Sin and Cos are the trigonometric functions creating the spiral. 10 is the frequency or the amount of spirals that.......
  • 1 Students
Watch Now
Add to Favourite

After Effects: Learn Basic Motion Graphics
Views: 19924
Likes: 143

  In this After Effects tutorial VideoFort Jon shows you how to keyframe shapes to recreate the classic Atari game Pong. Start out by creating a composition. Then add a rectangular shape and rename it Left Paddle, and position it on the left side of your comp. Then duplicate that shape and rename it Right Paddle and reposition it on the right side of the comp. From there create a small square to be the Pong ball. Once all the shapes are created you will start setting the position keyframes to animate your comp and voila, you have recreated Pong using keyframing in After Effects!...
  • 1 Students
Watch Now
Add to Favourite

Cinema 4D: Model a Soccer Ball
Views: 19733
Likes: 133

Learn how to turn a platonic shape into a soccer ball using Cinema 4D. Start out by creating a platonic shape and setting its type to Bucky. From there you need to get rid of the line separating the polygons into halves. To do that select each polygon individually and melt the two halves together. Then VideoFort Don shows you how to extrude the polygons to give your soccer ball a rounded look. Now you can add texture and color to the ball by creating two new materials, one white and one black. Apply the white material to the entire ball. After you’ve applied the white, select the center most segments of the 5-sided polygons, then go to selection, grow selection. Notice the next segment of the polygon fill, hit “U I” to repeat this until all segments of the 5-sided polygons are filled. After you have all the 5-sided polygons selected you can apply the black material to the ball. You should now have a ball that resembles a soccer ball....
  • 1 Students
Watch Now