After Effects: Pac-Man Part 2- Masking and Animating Pac-Man
In this http://www.VideoFort.com After Effects Pac-Man tutorial series VideoFort Jon gives a in depth looks at motion graphics and layering, teaching how to recreate the classic Atari game, Pac-Man.
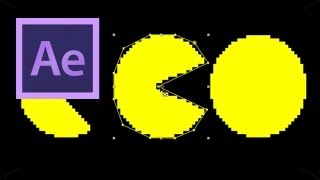
In this http://www.VideoFort.com After Effects Pac-Man tutorial series VideoFort Jon gives a in depth looks at motion graphics and layering, teaching how to recreate the classic Atari game, Pac-Man. In Pac-Man Part 2 VideoFort Jon covers how to keyframe Pac-Man’s mouth to open and close. Start out by bringing the “BoardandCharacters.png” into your Game comp. From there you will right click on the layer and choose to Pre Compose it, leaving all attributes in the comp, and name it “Pac-Man”. Open the Pac-Man pre-comp by double clicking on it, this brings you into the pre-comp. Select the “BoardandCharacters.png” layer and rename it “1”. From there you will create a mask, using the Rectangle Tool, around the larger, filed in Pac-Man (yellow circle) in the top right corner of the png. Duplicate this layer and shift the mask left until the partially open Pac-Man is revealed. Notice how the layer is renamed “2” automatically. Once you have the mask where you’d like it, duplicate this layer and shift the mask left to reveal the final, wide open Pac-Man. Notice how the layer is renamed “3” automatically. You need to center the Anchor Points for each layer using the pan behind tool. When you have the Anchor Points centered, place “1” on top, “3” on bottom, with “2” in between and align them on top of each other. Now you will set keyframes for the Opacity levels for Layers “1” and “2”. Once the keyframes have been correctly set for the duration, your Pac-Man should be chomping away.