After Effects: Pac-Man 3- KeyFraming Pac-Man
In this http://www.VideoFort.com After Effects Pac-Man tutorial series VideoFort Jon gives a in depth looks at motion graphics and layering, teaching how to recreate the classic Atari game, Pac-Man.
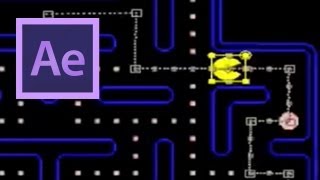
In this http://www.VideoFort.com After Effects Pac-Man tutorial series VideoFort Jon gives a in depth looks at motion graphics and layering, teaching how to recreate the classic Atari game, Pac-Man. In Pac-Man Part 3 VideoFort Jon covers how to keyframe Pac-Man’s position around the gameboard. Start out by selecting the “Pac-Man” pre-comp in your “Game” comp. Then press “p” on your keyboard, this will bring up Pac-Man’s position values. Bring your time indicator to the begining of the timeline and then press the stopwatch next to the Position transform values. This will give you the start keyframe. Make sure to right angle the position point by selecting the pen tool and clicking on the first position point. Then move the time indicator forward, pay attention to Pac-Man’s mouth, this will let you know how far in time to advance (Pac-Man should move about 3-5 dots per open and close). Once you have the time indicator set move Pac-Man to the position on the board where you want him. Continue this process until you have reached the end of you comp. Once you have all your points set, review the movement and reset any points that need to be fixed. From there you will set rotation keyframes to have Pac-Man face the correct direction when traveling.