Cinema 4D: Connect Objects
In this tutorial VideoFort Don teaches you to connect elements with a spline using Cinema 4D. Start out by adding objects to a cloner. Set the cloner mode to "Radial", and the clones to "Iterate".
In this tutorial VideoFort Don teaches you to connect elements with a spline using Cinema 4D. Start out by adding objects to a cloner. Set the cloner mode to “Radial”, and the clones to “Iterate”.
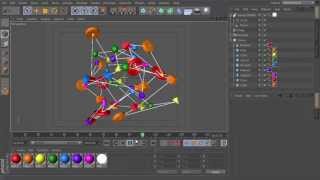
You can also apply materials to your objects to give them color, VideoFort Don chose a spectrum. After you have applied the materials to your objects, set keyframes for the count and radius for the cloner. From there you will select your cloner and add the Random MoGraph effector and then change the parameters of the Random effector. To smooth out the animation add a Delay effector. To link all your objects together, click on the Cloner and add a MoGraph Tracer. Make sure the tracking mode is set to Connect Elements. Then you need to add a Circle, and Sweep NURBS object. Set the Circle’s radius to about 2 cm and add the Circle and Tracer to the Sweep NURBS object, with the circle above the Tracer. Add a white material with a luminance to the Sweep NURBS object for added effect and you are finished!